
Custom Domain for Review Request Emails
What is the Custom Domain feature?
Custom Domain allows you to use your own business domain name when sending product review request emails to customers. Instead of emails being sent from our default address ( [email protected]), emails will be sent from an address with your domain ( [email protected]).
Why use Custom Domain?
- Reduce email spam rate: Emails from your business domain are more likely to bypass spam filters
- Increase brand recognition: Customers see emails coming from your familiar domain name
- Higher email open rates: Customers tend to open emails from sources they trust
How to set up Custom Domain
1. Access the Custom Domain settings screen
- Go to the Settings page.
- Navigate to Email & Domain Settings.
- Under the Sender Email section, click the Edit Subdomain button.
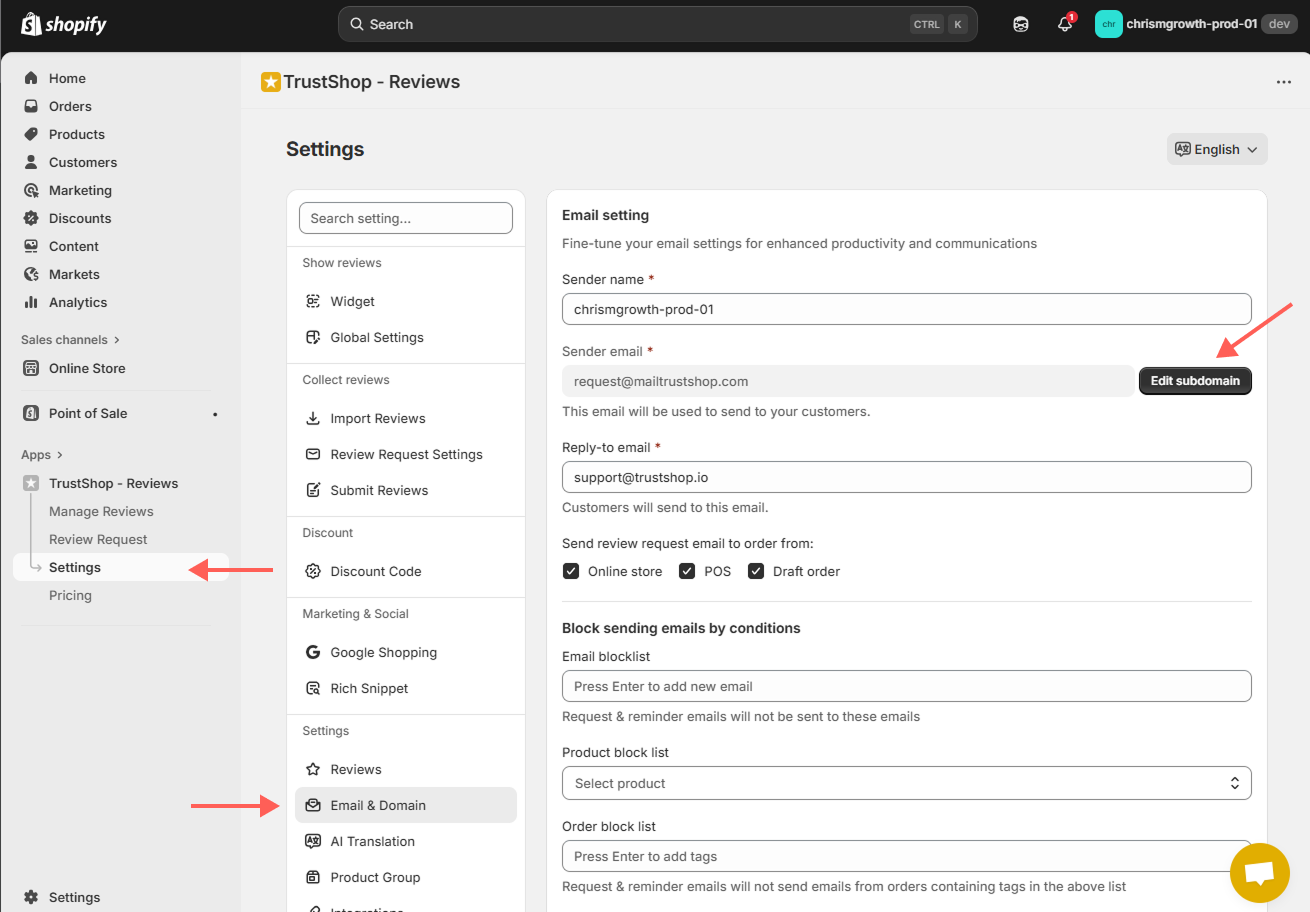
2. Enter email your sub domain information
- Enter the email sub domain you want to use (e.g., if you want to use [email protected] enter sub domain reviews.yourdomain.com)
- Click Continue
Note: You need to enter your main subdomain, not main domain.
3. Add DNS records
After entering your domain information, you'll receive a list of DNS records to add. Log in to your domain management account (GoDaddy, Namecheap, Google Domains, etc.) and add the following records:
DKIM Record
TYPE | HOST NAME | VALUE |
|---|---|---|
CNAME | [DKIM string provided in setting]._domainkey | [DKIM string provided in setting] |
CNAME | [DKIM string provided in setting]._domainkey | [DKIM string provided in setting] |
CNAME | [DKIM string provided in setting]._domainkey | [DKIM string provided in setting] |
Custom from record
TYPE | HOST NAME | VALUE |
|---|---|---|
MX | ||
TXT | "v=spf1 include:amazonses.com ~all" |
DMARC record
TYPE | HOST NAME | VALUE |
|---|---|---|
TXT | _dmarc | "v=DMARC1; p=none;" |
Tip: Copy and paste values directly from the dashboard to avoid typing errors.
4. Verify DNS configuration
- After adding all DNS records, return to the Product Reviews dashboard
- Click the Verify Configuration button
- The system will check each DNS record and display its status (Verified/Not Verified)
Note: The verification process may take up to 24-48 hours due to DNS propagation time. Please be patient and check again later if not immediately successful.
5. Activate and test
- When all records have been successfully verified, click the Activate Custom Domain button
- Send a test email to your email address by clicking Send Test Email
- Check your inbox to confirm the email was sent from your custom domain
Common issues
DNS records not verifying
Possible causes:
- Incorrect record information
- Not enough time for DNS propagation
- DNS provider has special formatting requirements
Solutions:
- Double-check your entries, ensuring there are no spaces or special characters
- Wait at least 24-48 hours and try verifying again
- Contact your DNS provider for assistance with their specific format requirements
Emails still being sent from default address
Possible causes:
- Custom domain not activated
- Issues with DNS configuration
Solutions:
- Check activation status in the dashboard
- Ensure all DNS records have been verified
- Check the test email again after activation
Emails going to spam folder
Possible causes:
- Incorrect SPF or DKIM records
- Domain reputation needs time to build
Solutions:
- Double-check SPF and DKIM records
- Ask customers to add your email address to their safe contacts list
- Use the custom domain for a period of time to build reputation
Frequently Asked Questions
Can I change my custom domain after it's been set up?
- Yes, you can change it anytime by deactivating the current domain and setting up a new one.
Can I use my main domain instead of a subdomain?
- No, for security reasons and to avoid conflicts with existing email configurations, we require using a subdomain.
Need more help?
If you need additional support with setting up Custom Domain:
- Support Email: [email protected]
- Live Chat: Available from 9:00 AM - 5:00 PM GMT+7 on business days
Updated on: 21/03/2026